경희대학교 김정욱 교수님의 컴퓨터 구조 수업을 기반으로 정리한 글입니다.
Misses in Direct-Mapped Cache (Problem)
Example

▶ 0, 8, 0, 6, 8 address를 cache(size: 4)에 저장하는 상황
- 0 -> cache memory의 index 0 위치에 Memory[0]에 대응되는 data 저장
- 8 -> cache memory의 index 0 위치(switch)에 Memory[8에 대응되는 data 저장
- 0 -> cache memory의 index 0 위치(switch)에 Memory[0]에 대응되는 data 저장
- 6 -> cache memory의 index 2 위치에 Memory[6]에 대응되는 data 저장
- 8 -> cache memory의 index 0 위치(switch)에 Memory[8]에 대응되는 data 저장
-> cache memory의 index 1, 3은 계속 empty이므로, 비효율적이다.
Associative Cache Memory (Solution)
1. Fully associative cache

▶ Fully associative cache
빈 공간 알아서 찾아가는 방법으로, block은 cache의 어느 위치든 갈 수 있다.
때문에 값이 잘 사라지지 않기에 hit, miss 측면에서는 굉장히 좋다.
하지만 Direct-mapped cache의 경우엔 data가 어디에 있는지 위치를 알기에, 찾을 때 한 곳만 가보면 되지만,
Fully associative cache의 경우, 모든 위치를 일일이 찾아다녀야 하는 문제가 있다.
-> cache의 모든 위치에 대해 comparator가 병렬적으로 연산을 수행하기에 hardware cost가 증가한다.
2. (N-way) Set associative cache
Set associative cache는 Direct-mapped cache의 장점인 관리가 수월하는 것과, Fully associative cache의 장점인 값이 잘 사라지지 않는다는 것을 결합하여, 자유도는 주되, 관리는 철저히 하는 가장 현명한 방식이다.

▶ (N-way) Set associative cache
Direct-mapped cache 방식은 하나의 위치에만 놓을 수 있었는데,
Set associative cache 방식은 set을 둠으로써, block N개 중 마음대로 선택할 수 있도록 한다.
이때, set은 N개의 block으로 구성된 것을 말한다.
The set is determined: (Block number) modulo (Number of sets in the cache)
set이 다 찬 상태에서 새로운 값이 들어왔을 때 어떤 값을 없앨지는 temporal locality에 의해 결정된다.
-> Replacement is based on the LRU(least recently used) block within the set
ex) 저장 순서: 1, 2 -> 1을 제거 (2는 temporal locality에 의해 다시 사용할 확률 높음)
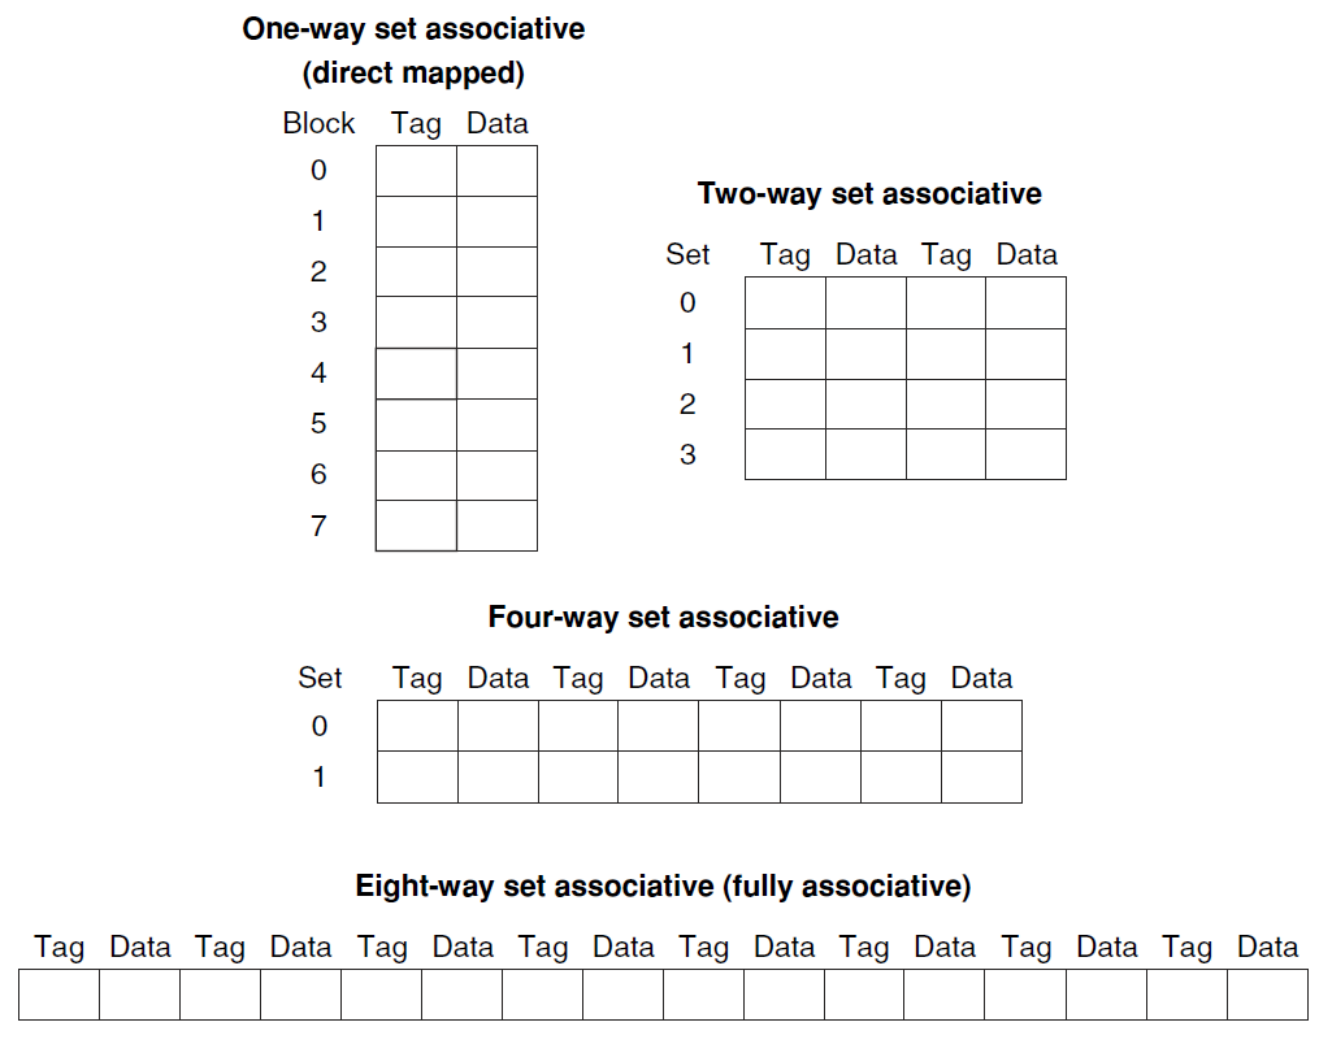
▶ N-way set associative cache for eight block cache (Example)
- 1-way set associative: 1 set 당 1 block -> set 개수: 8 (Direct-mapped cache)
- 2-way set associative: 1 set 당 2 block -> set 개수: 4
- 4-way set associative: 1 set 당 4 block -> set 개수: 2
- 8-way set associative: 1 set 당 8 block -> set 개수: 1 (Fully associative cache )
N-way라는 것은 N개의 자유도(block 개수)가 있다는 의미이다.
이때, Direct-mapped cache, Fully associative cache 방식도 LRU 기법에 의해 교체한다.
Increasing the degree of associativity (자유도)
- 장점: miss rate 감소
- 단점: hit time 증가
hit time 손해보는 것 보다 hit rate 높여 main memory로 가는 시간을 절약하는 게 더 좋다.

▶ Fully associative cache (Example) - 0, 8, 0, 6, 8

▶ 2-way set associative cache (Example) - 0, 8, 0, 6, 8

▶ reduction in the miss rate by increasing associativity (자유도)
associativity가 너무 올라가면 더이상의 improvement는 거의 없다.
그 이유는 자유도가 많아봤자, temporal locality에 의해 불렀던 값을 계속 부를 확률이 높기 때문이다.
Locating a Block in the Cache

▶ 4-way set associate cache
- 4개의 comparator와 4-to-1 multiplexor(MUX) 필요
이때 MUX는 set 중 hit된 것만 1 (tag bit = 1, valid bit = 1)인 것을 이용해 data를 선택한다.
※ 위 그림에선 1 block이기에 block offset이 없다. (tag / cache index / offset)
Choosing Which Block to Replace
1. Direct-mapped cache
- 요청된 block이 저장될 위치의 block이 교체됨
2. Set-associative cache
- 선택된 set에 포함된 blocks 중에 선택
- Least recently used (LRU): 가장 오래 사용되지 않은 block이 교체됨
3. Fully associative cache
- 모든 block이 교체 후보 (candidate for replacement)
Discussions (Size of Tags vs. Tag associativity)
Given 4096 block cache, 4-word block size, and 32-bit address, find the total number of sets and the total number of tag bits for caches that are (1) direct mapped, (2) two-way and (3) four-way set associative, and (4) fully associative
1. Direct-mapped cache
- total number of sets = 4096 = 2^12 (= index 개수 = 전체 block 개수) -> cache index bit = 12
- total number of tag bits for caches = 하나의 index에 대한 tag bit * 전체 block 개수 = (32 - cache index bit - block offset bit - offset bit) * total number of sets = (32 - 12 - 2 - 2) * 4096 = 16 * 4096 = 2^4 * 2^12 = 2^16 = 66K tag bits
2. 2-way set associative
- total number of sets = 4096 / 2 = 2048 = 2^11 -> cache index bit = 11
- total number of tag bits for caches = 하나의 block에 대한 tag bit * N(set 당 block 개수) * total number of sets = (32 - 11 - 2 - 2) * 2 * 2048 = 17 * 2 * 2048 = 34 * 2048 = 70K tag bits
3. 4-way set associative
- total number of sets = 4096 / 4 = 1024 = 2^10 -> cache index bit = 10
- total number of tag bits for caches = 하나의 block에 대한 tag bit * N(set 당 block 개수) * total number of sets = (32 - 10 - 2 - 2) * 4 * 1024 = 18 * 4 * 1024 = 72 * 1024 = 74K tag bits
4. Fully associative
- total number of sets = 1 = 2^0
- total number of tag bits for caches = (32 - 0 - 2 - 2) * 4096 * 1 = 28 * 4069 = 115K tag bits
※ 1,000 = 1 K / block offset, offset는 2로 고정
자유도가 커질 수록, 개별 식별에 사용할 tag bit은 증가한다.
set이 2(2^1)개면 1 bit, 1(2^0)개면 0 bit가 필요함에 주의해야 한다.
Multilevel Caches
Multilevel cache
cache는 크기가 작아 miss가 많이 발생한다.
결국, main memory로 접근하는 시간이 더 길어지게 된다.
-> Primary Cache보다 속도는 느리긴 하지만, 용량이 더 큰 Cache를 Secondary Cache로 둔다. (additional level of caching)

▶ main memory 접근 시간 >> second-level cache 접근 시간
기존에는 Primary Cache에 data가 없으면 무조건 Main Memory에 접근해야 했지만,
Secondary Cache를 둠으로써, Primary Cache에 data가 없더라도 Secondary Cache에 data가 있을 확률이 높아진다.
물론, Secondary에도 data가 없을 경우, 더 큰 miss penalty가 발생한다. (main memory -> secodary cache -> primary cache)
※ 더 큰 miss penalty에도 불구하고, 3개 이상의 cache를 두는 게 좋다.
Performance of Multilevel cache (Example)
- Proccesor with a base CPI: 1.0
- Clock rate: 4 GHz -> Clock cycle time = 0.25 ns/clock cycle
- Miss rate per instruction: 2%
- Main memory access time: 100 ns (all miss handling 포함)
- A secondary cache access time: 5 ns
※ CPI: Clock cycles Per Instruction / Clock rate = Clock cycle time의 역수 / Clock cycle: clock cycle 개수
※ Clock cycle time 단위가 ns/clock cycle인 이유는 clock cycle time이 한 클럭 주기를 완료하는 데 걸리는 시간이기 때문이다.
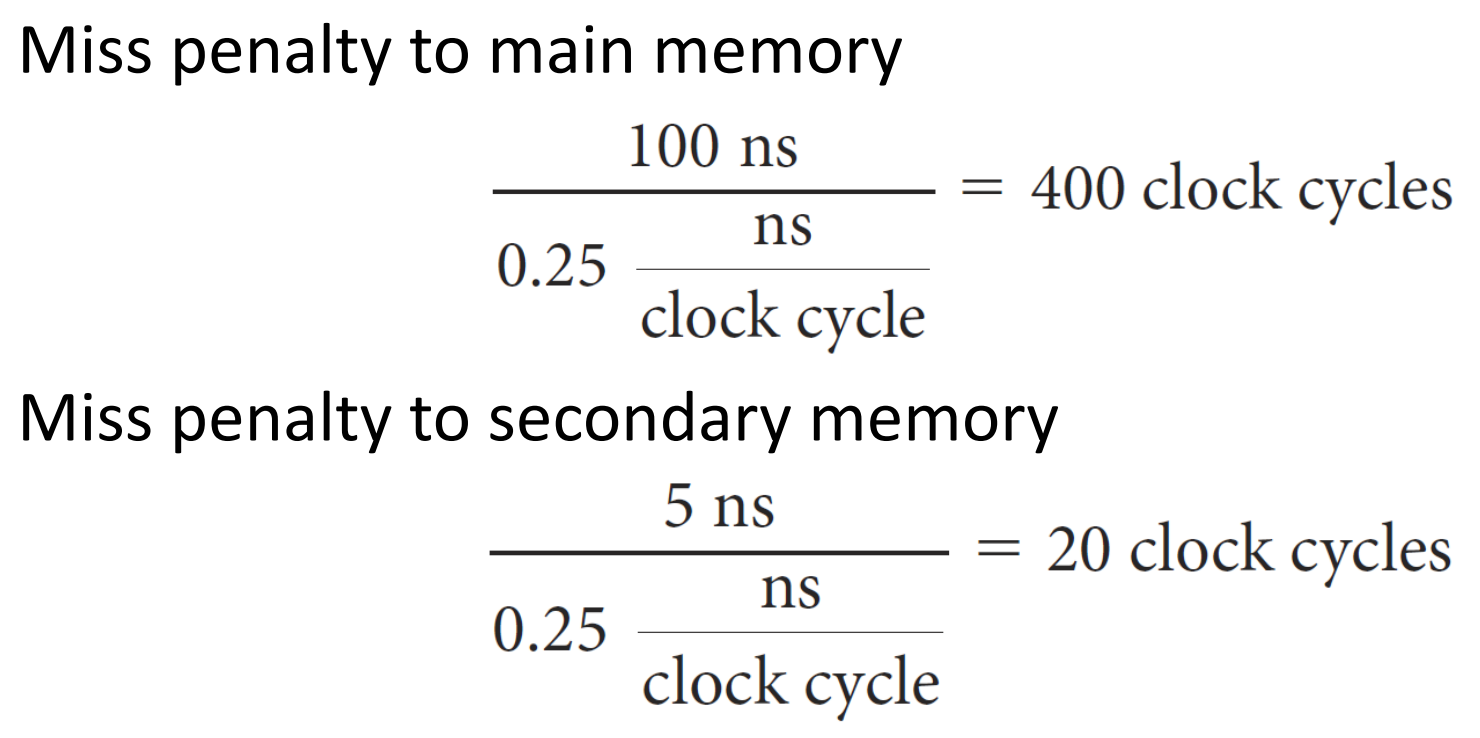
▶ main memory로 가는 penalty / secodary memory로 가는 penalty
main memory에 대한 miss rate = 0.5%일 때,
secondary cache를 추가하면 얼마나 더 빨라질까?

▶ secondary cache가 없을 때 / 있을 때 clock cycle 기대값
-> 위 예시에서는, secondary cache를 사용하는 CPU가 2.6배 만큼 빠르다.
※ 이때 primary cache보다 second cache가 더 크기 때문에, secondary cache에 대한 miss rate은 main memory에 대한 miss rate보다 크다.
※ effective CPI: cpi와 유사하나, 좀 더 실제적인 성능 평가이다.
Virtual Memory
Virtual Memory
Virtual Memory는 실제 존재하는 memory가 아니라 technique, 기법이다.
이 기법은 main memory를 hard disk의 cache인 것처럼 사용하는 기법이다.

▶ memory
- hard disk: 진짜 data가 존재하는 memory
- main meory: 임시적으로 data를 저장하기 위한 memory
- cache: 임시적으로 저장한 data 중 더 자주 쓰는 data를 저장하는 memory
Virtual memory는 CPU에게 main memory의 용량을 부풀려 말하는 개념으로,
CPU hardware와 OS(operating system, 운영 체제)에서 관리한다.

▶ Cache Memory vs. Virtual Memory (Main)
- Cache Memory: CPU의 속도, 즉 datapath를 빠르게 처리하기 위해 물리적으로 data를 저장하는 memory
- Virtual Memory: main memory의 capacity(용량)를 향상시키기 위해 부풀려 말하는 technique
※ Virtual Memory는 진짜로 용량을 늘릴 수는 없다.
Virtual Address

▶ Programs can share main memory
- Virtual address: An address in the virtual memory
- Physical address: An address in main memory
virtual address는 Program이 만들기 때문에, Program마다 virtual address는 다르다.
그리고 이러한 virtual address는 물리적으로 존재하는 physical addres로 변환(번역)해 줘야 원하는 값을 가져올 수 있다.
Address translation (= Address mapping)
virtual address를 physical address로 매핑(번역)하는 것은 CPU와 OS에서 수행한다.
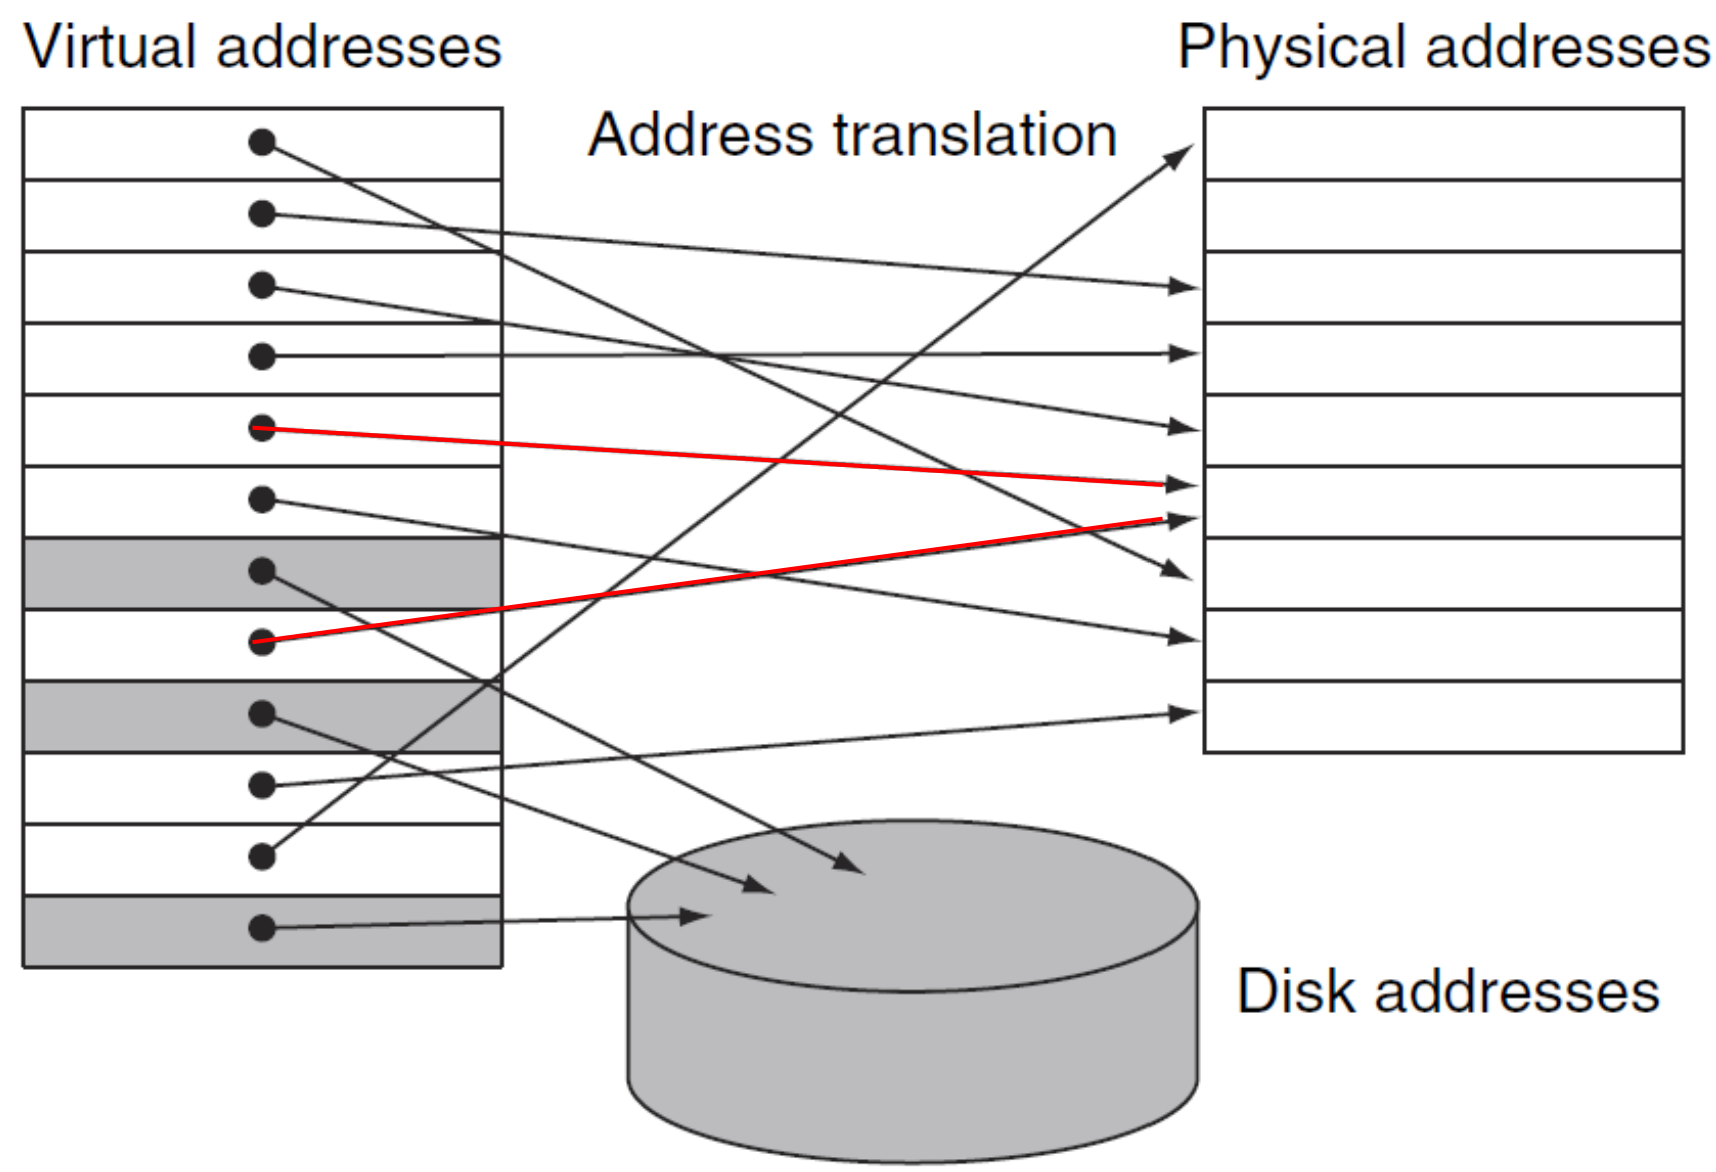
▶ Address translation
- Virtual memory block: page (similar to the block in Cache)
- Virtual memory miss: page fault (similar to the miss in Cache)
하나의 physical address는 여러 개의 virtual address에 의해 공유될 수 있다.
즉, 여러 개의 program이 하나의 같은 data를 공유할 수 있다.
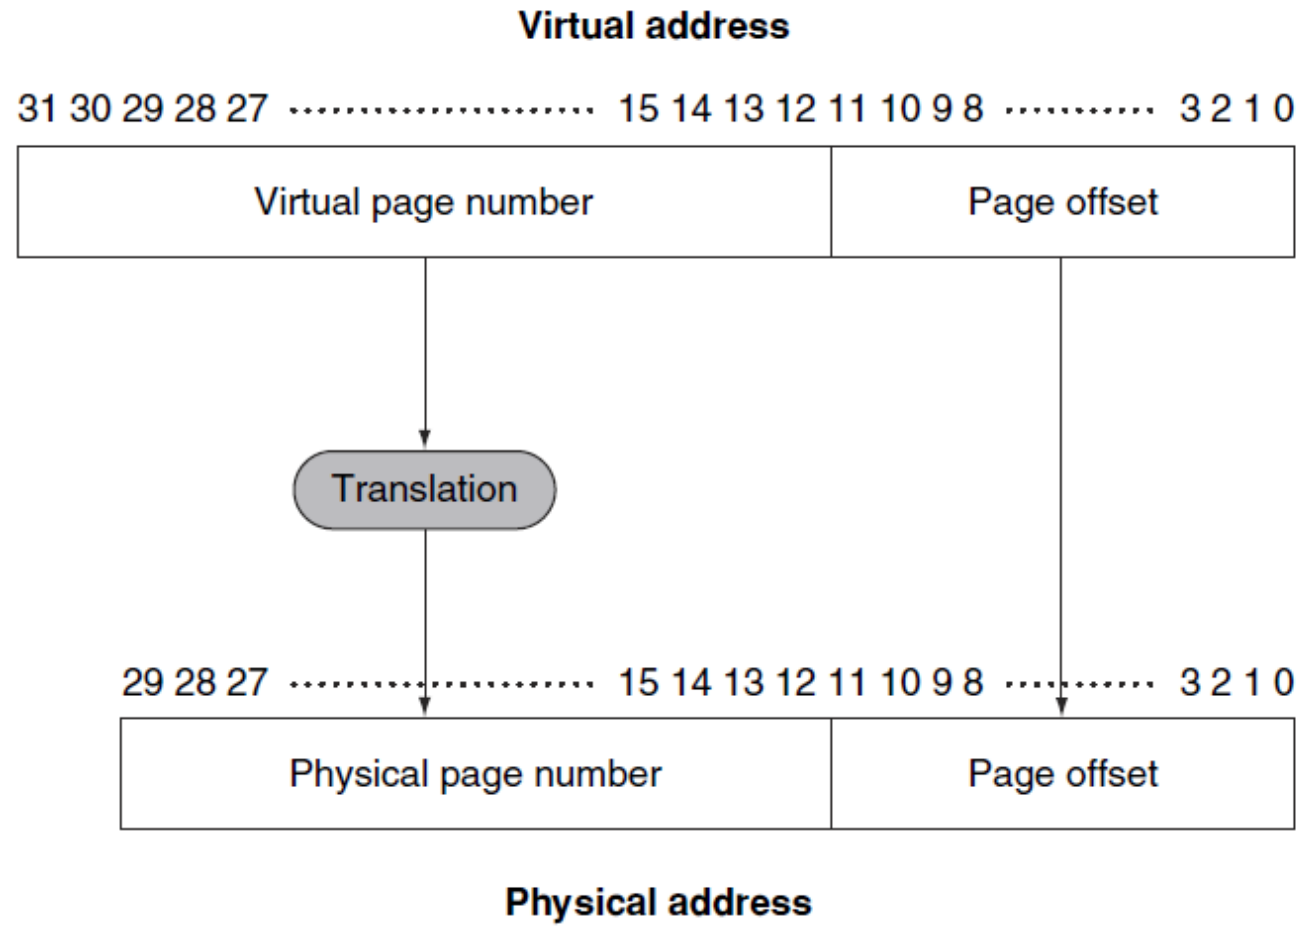
▶ Address translation (Example)
- Virtual Memory: 32bits (2^32 = 4GB)
- Physical Memory: 30bits(2^30 = 1 GB) (예시: 4배 불려서 말함)
- Page size: 2^12 = 4096 = 4KB
-> 20 bits virtual pages are translated into 18 bits physical pages
이때, Page offset은 불려 말할 수 없고 그대로 가져와야 한다.
※ 1024 bytes = 1 KB (kilobyte) / 1024 KB = 1 MB (megabyte) / 1024 MB = 1 GB (gigabyte)
Translation using Page Table
Page Table
Virtual address를 Physical address로 translation 하기 위한 사전의 개념으로,
data가 아닌, translation 하기 위한 정보가 들어있으며, main memory에 위치한다.
program은 각자의 page table을 가지고 있어, program의 virtual address space를 main memory에 매핑한다.
- Page table register in CPU: program에 따라 번역을 하기 위해 physical memory에 있는 page table의 address를 가리킴
1. If page is present in memory
- page table: physical page number + oter status bits(valid, dirty bits 등) 저장
2. If page is not present in memory (Page fault)
- OS: page를 가져오고(fetching), page table을 updating
- page table은 swap space(on disk)의 위치를 참조 가능
- swap space: virtual memory를 위한 추가적인 공간을 disk에서 할당해주 공간 (virtual memory가 부풀려 말한 공간)

▶ Translation using Page Table 1
page table은 virtual page number로 인덱싱되어, 해당 physical address를 얻는다.
이때, valid한지, 그리고 virtual page number와 같은지 체크한 후, 맞으면 physical page number로 바꿔준다.
여기서 valid bit이 0이면, page table이 아예 존재하지 않는 게 아니라,
main memory에는 없되, disk의 swap space에는 존재한다.

▶ Translation using Page Table 2
※ 위 그림에서 Process는 Program으로 보면 된다.
Page Faults
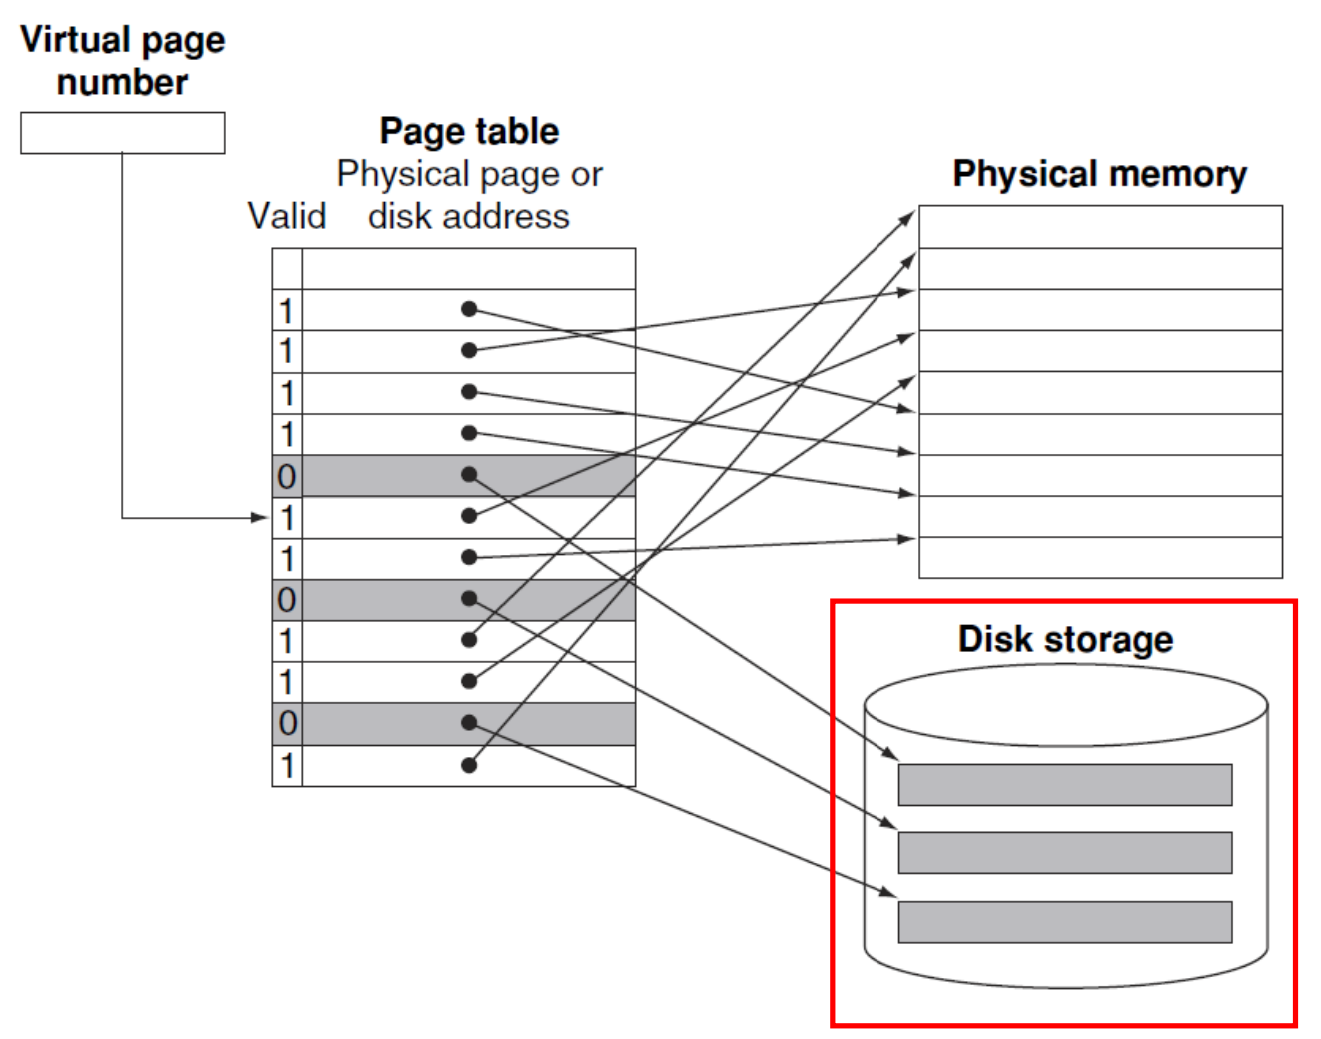
▶ Page Faults
- valid bit = 1 (on): page table에 virtual page number와 일치하는 physical page number 정보 존재
- valid bit = 0 (off): 지정된 disk address에만 page가 존재 -> OS가 제어권을 가져야 함
※ valid bit = 1 -> page table이 main memoory에 존재 / valid bit = 0 -> page table이 disk의 swap sapce에 존재
찾고자 하는 page table이 main memory에 없으면, 즉 page fault이면,
page table은 disk에 존재하게 되는데, 주로 disk의 swap space에 존재하게 된다.
page fault가 발생했을 때, main memory의 모든 page가 사용 중이라면,
OS는 LRU(Least recently used)에 따라 page를 교체한다. (temporal locality) (OS가 Handling 함)
이때, reference bit을 활용해 찾는다.
Reference bit (use bit)
- Reference bit = 1: 페이지가 접근될 때마다 설정되며, OS가 주기적으로 0으로 초기화 함
- Reference bit = 0: 최근에 사용되지 않았음을 나타냄 -> 교체될 후보
※ main memory는 매우 크기 때문에 reference bit을 사용하는 것과 랜덤으로 아무 값이나 빼는 것 사이에 큰 차이가 없다.
Disk에 쓰는 작업은 수백만 사이클이 걸린다.
- Write through(바로 쓰기)는 실용적이지 않음 -> Write back 사용
- Dirty bit: 페이지가 업데이트되면 set
- wtire through: 업데이트되자마자 메모리에서 Disk로 변경 사항 적용
- write back: dirty bit 적용해놨다가 교체될 때 한 번에 적용
Translation-lookaside buffer (TLB)
Making Address Translation Fast using TLB
page table을 읽기 위해 계속 main memory로 접근하면 cache로 읽는 의미가 없다. (memory 접근: 최소 2배 시간 소요)
때문에, page table을 cache화 하는 TLB (Translation-lookaside buffer in cache)가 필요하다.
※ TLB는 physical memory로 접근을 하는 게 아니라, 접근할 address를 가지고 있는 것이다.
Translation-lookaside buffer(TLB)
Page table의 Cache (in SRAM) 버전으로, page table (in main memory)에 대한 접근을 피하는 것을 목적으로 한다.
page table보다 당연하게 크기가 훨씬 작아, recently used address mappings를 사용한다.
※ SRAM: cache / DRAM: main memory

▶ Translation-lookaside buffer (TLB) example
- Valid bit: 값이 존재하는지 나타냄
- Dirty bit: 값이 업데이트되었는지 나타냄
- Ref bit: 값이 최근에 참조되었는지 나타냄 -> LRU (Least Recently Used)에 따라 교체 여부 결정
TLB (Translation lookaside buffer): page table 조회를 빠르게 하기 위한 cache 역할을 한다.
때문에, 가장 먼저 virtual page number와 TLB의 tag를 비교하여, 같으면 physical address로 이동한다.
- 기존 방식: page table을 바로 virtual address와 비교해서 physical memory (main memory)에 접근
- TLB 방식: TLB를 virtual address와 비교해서 physical memory (cache)에 접근 (없으면 main memory에 접근)
이때, TLB에 있는 것들은 거의 main memory에 실제로 존재해야 한다는 특징이 있다.
물론, disk의 swap space라는 곳에 있을 수도 있으나, disk에는 대부분 잘 안 쓰이는 것들이 저장되는 공간이기에,
자주 쓰이는 TLB는 거의 main memory에 존재한다.
또한, 위 그림에선 TLB가 physical memory로 접근을 하는데,
사실 TLB도 cache에 없어야 physical memory로 접근을 한다.
※ page table in DRAM (main memory) / TLB in SRAM (cache)
TLB and Cache Interaction

▶ TLB and Cache Interaction
hit이면 cache inde와 block offset이 합쳐진 값에 대응되는 data를 꺼내오면 된다.
※ Block offset: block offset 정보까지 포함해야 block 내에서 data의 정확한 위치 파악 가능

▶ Processing a read or write in TLB and cache
※ TLB miss가 났다는 것은 최근에 쓰이지 않았다는 의미이며, 이 경우 main memory 혹은 disk에 위치한다.
※ Read - No: 용량이 더 작은 TLB에는 있지만, cache에는 없는 경우가 있다. 그 이유는, TLB는 주소 매핑 정보를 저장하고 캐시는 데이터 자체를 저장하기 때문에, 주소는 변환되어도 데이터가 캐시에 없을 수 있다.
Handling TLB Miss and Page Faults
virtual address로 접근하여 TLB로 가는데, TLB도 공간에 한계가 있기에 TLB miss가 발생한다.
TLB miss가 발생하는 경우
- TLB Miss: TLB에 원하는 translate된 정보가 없을 때 (memory엔 존재)
- Page Fault: 가리키는 page가 실제로 Main Memory에 없을 때 -> OS updates the page table
TLB miss가 발생하는 경우 조치
- TLB Miss -> memory에 있는 값으로 TLB, Cache update
- Page Fault -> disk에 있는 값으로 Page Table, TLB, Main Memory, Cache update
OS (operating system) knows the page fault
1. disk로 접근할 위치를 찾기위해 page table에서 virtual adress에 대응되는 위치를 찾는다. 즉, OS가 virtual address를 변환하여 disk로 접근할 위치를 찾는다.
2. 교체할 physical page를 선택한다. (reference bit = 0)
교체 전에 dirty bit = 1인 것은 값이 수정된 것이기 때문에 disk에 수정된 값을 우선 저장한다.
3. disk로부터 선택된 값을 main memory로 가지고 올려준다. (시간 오래 걸림)
4. main momory외에도, Page Table, TLB, Cache를 업데이트하여 instruction을 재실행할 수 있도록 준비한다.
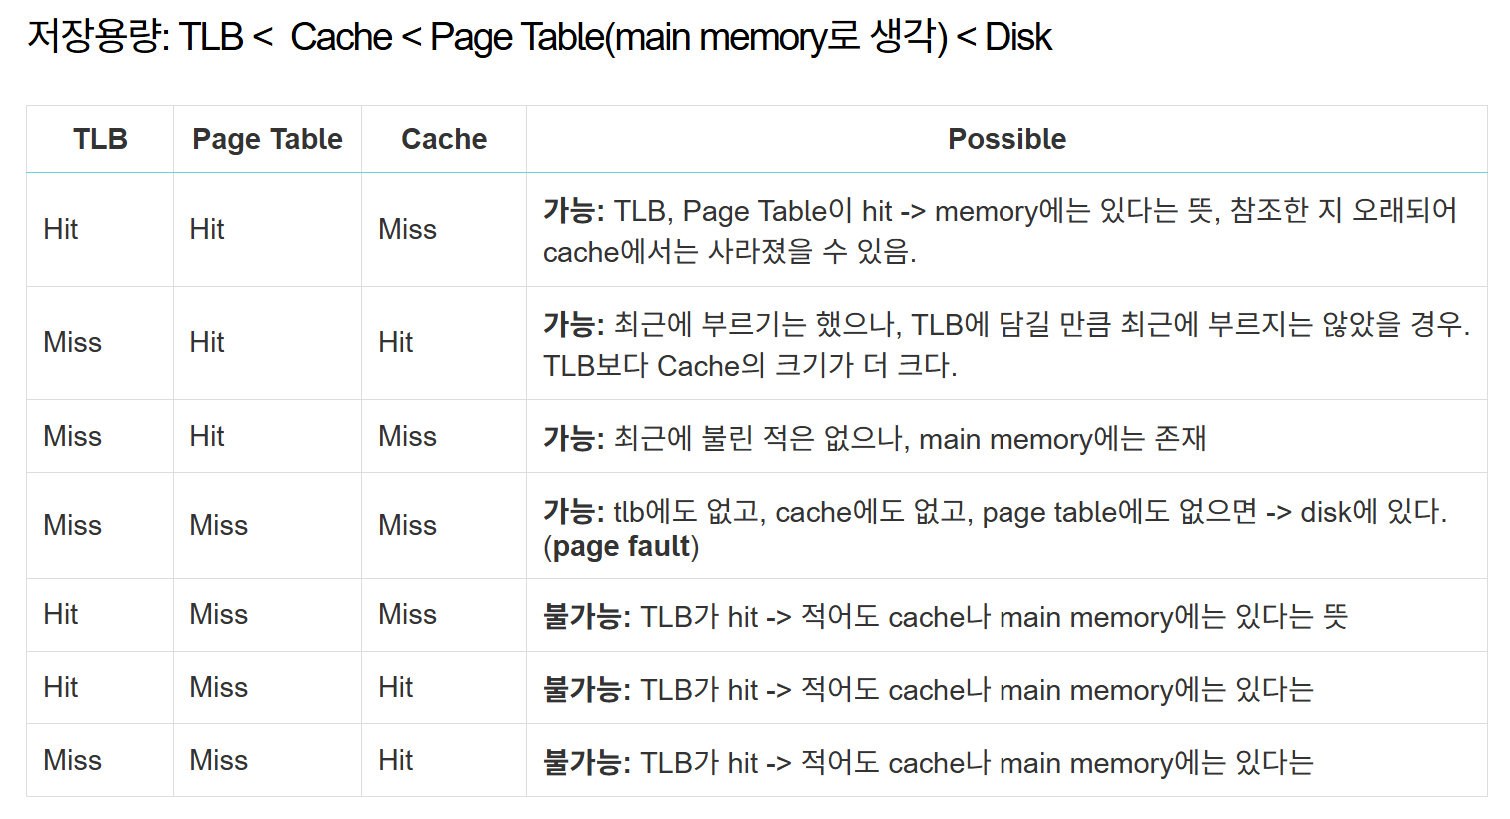
▶ TLB, Page table, Cache의 hit 여부에 따른 7가지 경우
- Miss / Miss / Hit: main memory에 없는데 cache에 있을 순 없다.
TLB는 Page table의 cache 버전이기 때문에 TLB가 hit이면 Page table도 무조건 hit이다.
또한, data를 요청한다는 것은 데이터가 아예 없는 게 아니라 적어도 disk엔 존재한다는 의미이다.
※ Pge table, TLB: address / Main memory, Cache: data
참고자료
https://sypdevlog.tistory.com/269
[컴퓨터 구조] Lecture 18: Memory Hierarchy - Part2
경희대학교 김정욱 교수님의 컴퓨터 구조 강의 내용을 기반으로 한 정리글 Misses in Direct-Mapped CacheExample - 0, 8, 0, 6, 8cache memory의 block size = 4 -> modulo 4 연산으로 cache memory에 main memory의 block 매핑0 mo
sypdevlog.tistory.com
'CS > 컴퓨터 구조' 카테고리의 다른 글
| Lecture 20: Additional Lecture (3) | 2024.12.15 |
|---|---|
| Lecture 19: Memory Hierarchy - 3 (0) | 2024.12.15 |
| Lecture 17: Memory Hierarchy - 1 (0) | 2024.12.07 |
| Lecture 16: The Processor - 5 (2) | 2024.12.06 |
| Lecture 15: The Processor - 4 (0) | 2024.12.03 |